Saturday, July 8, 2017

Image to Matrix and Matrix to Image conversion by retrieving RGB values

Let me go back into the background for writing this technical article. I was going through tutorials for Java FX , a Java library for creating desktop applications as well as rich internet applications and while going through the Image section of the tutorials , i questioned myself , how can an image be represented in a 2D dimensional matrix format & so i learnt how it is to be done and i am documenting it now.

Following are two functions that make the core of the program for reading from an image and persisting the RGB values in a 2D matrix or in a array of objects of a class . I find it easier to store it in a linkedList .

-> getRGBList

private List<ImageRGB> getRGBList(BufferedImage bufferedImage) {
          List<ImageRGB> rgbValues = new LinkedList<ImageRGB>();
           ImageRGB.setImageProperties(bufferedImage);
           for (int i = 0; i < bufferedImage.getWidth(); i++) {
                      for (int j = 0; j < bufferedImage.getHeight(); j++) {
                                 Color color = new Color(bufferedImage.getRGB(i, j));
                                 int red = color.getRed();
                                 int green = color.getGreen();
                                 int blue = color.getBlue();
                                 rgbValues.add(new ImageRGB(red, blue, green));
                      }
           }
           return rgbValues;
}

The above function takes the BufferedImage object , i will tell you later how that object was created .
  • Sets the ImageProperties  height , width and image type of the image 
  • Iterates over the each pixel in the image and get it's pixel data in RGB (bufferedImage.getRGB(i,j) , wrap it over the Color object and retrieve the red , green and blue components of the pixel.
  • I create an RGB object out of this value and add it to the linkedList of the Object.
After the end of execution of this method , we iterated over the rows of the image for each column of the image , i.e. iterate for each pixel in the height , for each pixel in the width and collected RGB values and stored them in an object . Now you can chose to persist this in database or serialize to a file or you name . I let it be in the memory for now .

-> generateImage

private void generateImage(List<ImageRGB> rgbValues, File destination) {
           try {
                  int k = -1;
                  BufferedImage image = new BufferedImage(ImageRGB.getWidth(),                                                     ImageRGB.getHeight(), ImageRGB.getImageType());
                  for (int i = 0; i < image.getWidth(); i++) {
                         for (int j = 0; j < image.getHeight(); j++) {
                                  k++;
                                  ImageRGB rgb = rgbValues.get(k);
                                  Color color = new Color(rgb.getRed(), rgb.getGreen(), rgb.getBlue());
                                  image.setRGB(i, j, color.getRGB());
                         }
                  }
                  ImageIO.write(image, "jpg", destination);
           } catch (Exception ex) {
                   ex.printStackTrace();
           }

 }

  • The above function is used to generate the image back from it's pixel values at each pixel.
  • The function takes the LinkedList we created in the previous method and an output File object to save the file .
  • It creates a Buffered Image object out of the Image Properties we had set in the previous method.
  • Iterates over each of the rows for each of the pixel in the width of the image , as we did in the previous method , generate the Color at that pixel after retrieving the RGB components from the ImageRGB object & set the pixel value at that pixel in the bufferedImage object.
  • After all the iterations are done , write the image to the destination. 
Do you get the exact image back , i bet you do , and it is indeed smart .

Lastly you need a main method to execute the above two methods and i would do the following

public class ImageProcessor {

           public static void main(String[] args) throws IOException {
           String srcFile = "C:\\Users\\adee\\Desktop\\src.jpg";
           String destFile = "C:\\Users\\adee\\Desktop\\destination.jpg";
           ImageProcessor iP = new ImageProcessor();
           BufferedImage bi = ImageIO.read(new File(srcFile));
           List<ImageRGB> rgbValues = iP.getRGBList(bi);
           iP.generateImage(rgbValues, new File(destFile));
 }
....
....

  • The above piece of code simply uses the javax.imageio libraries to read an image file and create a BufferedImage out of it which is passed to our method 1 to process the image.
Some more interesting things you can try out is to  get the contents of the image as a byte array 


byte[] bytes = ((DataBufferByte) bufferedImage.getRaster().getDataBuffer()).getData();

bufferedImage.getRaster() is an object of a  class representing a rectangular array of pixels. A Raster encapsulates a DataBuffer that stores the sample values and a SampleModel that describes how to locate a given sample value in a DataBuffer.
You can read more about Raster here .

Another interesting thing you could have done is , create a 2D array of number of rows = (height * width) of the Buffered Image and 3 columns representing the R G B components and iterating the same way over the Buffered Image and creating a 2D matrix out of the Image , and that would have made the program really cool . However i like to store it in an Object of RGB class for my convenience.

Lastly let me throw some light on RGB color space .The red, green and blue use 8 bits each, which have integer values from 0 to 255. This makes 256*256*256=16777216 possible colors. You can play around with the RGB values retrieved from the image and increase or decrease it for creating the image again , make sure it doesn't go beyond 255 and it doesn't go below 0. The newly generated image will be a totally new color

I hope you learnt something cool today .

Happy Coding
Friday, September 16, 2016

When the GRUB got confused .... i lost my heatbeat

Hello folks , today i am not writing any techincal stuff here but a personal experience where i almost ended up in losing three operating systems in one shot , Windows 8 (this is on my office laptop) on my internal hard drive , Linux ubuntu on a SATA hard drive(internal) which i use as an external drive by a sata to USB converter , and a windows Vista installed on the same hard drive in another partition .

Let's go in the past , I am running Linux ubuntu v15 on my external drive and for a week  i am getting notifications to update to Ubuntu v16 and Friday the 16th September ,  2016 , today , i decide to upgrade from v15 to v16. Now the upgrade goes on for an hour and after an hour it asks me for installing the grub. By the way my sata drive which i am using as an external drive is already having GRUB 2 that dual boots Windows vista and Linux for me . So now very carelessly forgetting that i already have a GRUB2 and i have an internal hard disk as well , my office laptop's disk  , i choose to select the first disk that shows on my screen for installing GRUB2 . Wow ..... it got installed as well , smooth and easy , awesome . Impressive.

Reboot , ok , bang on , and i remove the external hard drive because i want to continue with my usual work on my usual Windows that boots from my internal hard drive , and alas , what do i see grub rescue >>>>>> , what tha ??? just happened .

Just before the prompt , it says , unable to find disk <<xyz>>. Sooner i realized that the grub was installed on my internal hard drive and it's trying to load the Linux Ubuntu which i successfully upgraded to v16 on the external drive and becuase is not connected via USB  , so the grub rescue made sense.

Well what is horrifying here is this internal hard drive is bitlocker locked drive of my office laptop . WOW .... !! I am royally .. you know what i mean .

So i search on google a lot of articles for ways to exit the grub rescue and boot into windows by several hidden hacks but unfortunately i am not able to boot into my windows 8 Office installation. However, i could boot into Linux Ubuntu v16 and that at least saves me oneoperating system here , a relief.

After a long research of an hour , i understand that one cannot uninstall GRUB however one can overwrite the it on the MBR on internal hard drive by the Windows boot loader.

So this article  that saved my ### says .....

" I’m often, at least more than I care, asked how to restore a Windows MBR/bootloader without having a windows install cd or a dos boot disk at hand. It’s quite easy you need just a Linux live cd like (the Ubuntu live cd or Knoppix) or an installed Linux you want get rid of. I really don’t know why you want to do the second, but anyway here are the 2 solutions I know of."

Boot Linux and make sure you’ve a working Internet connection and type following on the terminal/konsole. "

Now the first solution he mentions , i totally do not understand what's he trying to do here but this worked for me . It's called the dd command (convert and copy a file) , the data destructor command :) , also they also call it. I had heard this dd first time around 15 years back when one of my friend said .. "Hey , if we wanna screw up our schools' compsci labs' systems , there's a dd command." Now i know how dd can fry it up. 

Anyhow

1. sudo apt-get install syslinux

2. sudo dd if=/usr/lib/syslinux/mbr.bin of=/dev/sda

because sda is my internal hard drive and i just wanted to fix this problem as soon as possible , i blindly ran this command ,in a rush to reboot my system , w/o the external hard drive and EUREKA , it worked , it really worked and now i was least able to get rid of the GRUB and the GRUB RESCUE and i was at my BITLOCKER ready to login .

Unfortunately , the mess was still there since i wrote(grub) into a non writable [I should not be doing any dual boot as per office policies on this office laptop] disk (sda) , it messed up the bitLocker and now it's asking me for a recovery key which off course i do not have and i need to solve this first thing Monday morning from the IT department at my office.

I am happy that i'll have to show them the bitlocker screen rather than showing the weirdo grub_resuce >> prompt and i am not sure what would have happened , if that would have happened .

SO where there is a will , there is way . I solved it , hurray . As well i lost one operating system in this process , "Vista".

Lastly , thanks to the guy who wrote this .

Sunday, August 7, 2016

Java RMI Remote Method Invocation - An insight into distributed applications

Java Remote Method Invocation enables a programmer to create distributed Java technology based applications in which object running in one JVM is able to invoke methods of a Java Application running in another JVM , even on different host. RMI uses object serialization on marshal and unmarshal parameters.

Overview of RMI Applications:

RMI applications comprise of two programs, a client and a server. A server program is a basically a Java application that provides remote objects by implementing a Remote Interface, makes references to such objects accessible and waits for a client to remotely invoke methods on such objects. A client obtains the reference to such remote objects and invokes methods on such objects.

RMI provides the mechanism by which the client and server communicate with each other and pass information back and forth. Such applications are called distributed object applications. RMI is implemented based on the Registry pattern.

As explained in the Registry pattern , a server calls the RMI Registry to register(bind) the remote object with a serviceName | role.The client lookup the Server's registry by the service name and gets the reference to a proxyObject that is used to invoke the remote methods of the object at the server side.

-> Locate remote objects using RMI Registry
-> Communicate with remote Objects.
-> Load class definitions of the objects passed back and forth.

Dynamic Code Loading -


The important feature of RMI is its ability to download the definition of an object's class if the class is not defined in the receiver's JVM. RMI sends the objects by their actual classes, not changing the object's behavior in the other JVM, enabling new types and behaviors to be introduced into a remote JVM, thus dynamically extending the behavior of an application.

 ----------------------------------------------------------------

Remote Object: 

  • An object becomes remote by implementing a remote interface which:
    -> extends the interface java.rmi.Remote.
    -> each method of the this interface declares java.rmi.RemoteException in its throws clause, in addition to any application-specific exceptions.

RMI treats a remote object differently from a non-remote object when an object is passed from one JVM to another JVM. Rather than making a copy of the implementation object in the receiving VM, RMI passes a remote stub for a remote object, that acts as a proxy, for the remote object. The client invokes a method on the local stub , which is responsible for carrying out the method invocation on the remote object.

Creating distributed applications using RMI

  1. Designing and implementing the components of the distributed application.
  2. Compiling Resources
  3. Making the classes accessible on the network.
  4. Running the application
Let's start with designing the architecture of our application. I will use a simple calculator application to be a distributed application. The methods exposed are sum, diff, prod and divide.

Step 1. Define the Remote Interface:

package remoteInterface;

import java.rmi.Remote;
import java.rmi.RemoteException;


public interface Calculator extends Remote {

public int sum(int a, int b) throws RemoteException;
public int diff(int a, int b) throws RemoteException;
public int prod(int a, int b) throws RemoteException;
public int divide (int a, int b) throws RemoteException;
}

Like previously said , a remote interface should extend java.rmi.remote and each of its methods should throw RemoteException.

Step 2. Implementing the Remote Object:

package remoteServer;
import remoteInterface.Calculator;

public class RemoteCalculator implements Calculator {

@Override
public int sum(int a, int b) {
return a + b;
}

@Override
public int diff(int a, int b) {
return a - b;
}

@Override
public int prod(int a, int b) {
return a * b;
}

@Override
public int divide(int a, int b) {
return a / b;
}
}

Above we have implemented the remote object whose methods are to invoked by another application running in another JVM.

Step 3: Create and export a remote object and register it with Java RMI registry:

package remoteServer;

import java.rmi.AlreadyBoundException;
import java.rmi.RemoteException;
import java.rmi.registry.LocateRegistry;
import java.rmi.registry.Registry;
import java.rmi.server.UnicastRemoteObject;

import remoteInterface.Calculator;

public class RegisterRemoteCalculator {

public static void main(String[] args) {
try {
Calculator stub = (Calculator) UnicastRemoteObject.exportObject(
new RemoteCalculator(), 0);
Registry r = LocateRegistry.getRegistry();
r.bind("calculator", stub);
} catch (RemoteException | AlreadyBoundException e) {
e.printStackTrace();
}
}
}

The above class defines a main method that creates a remote object of class RemoteCalculator. Additionally, the remote object must be exported to the Java RMI runtime so that it may receive incoming remote calls.

The static method UnicastRemoteObject.exportObject exports the supplied remote object to receive incoming remote method invocations on an anonymous TCP port and returns the stub / proxy for the remote object to pass to clients. Post this call , the run-time may begin to listen on a new server socket or may use a shared server socket to accept incoming remote calls for the remote object. The returned stub implements the same set of remote interfaces as the remote object's class and contains the host name and port over which the remote object can be contacted.

Java RMI provides a registry API for applications to bind a name to a remote object's stub and for clients to look up remote objects by name in order to obtain their stubs. A Java RMI registry is a simplified name service that allows clients to get a reference (a stub) to a remote object.

The static method LocateRegistry.getRegistry returns a stub that implements the remote interface java.rmi.registry.Registry and sends invocations to the registry on localhost on the default port of 1099.

The bind method is then invoked on the registry stub in order to bind the remote object's stub to the name "calculator" in the registry.

At this point ensure your /etc/hosts file contains an entry for 127.0.0.1 for localhost and the ipAddress of the machine to the domainName, and such information is sent over to the client with the stub for the client to be able to connect to the remote Object.

Step 4: Implementing the Client:

package client;

import java.rmi.NotBoundException;
import java.rmi.RemoteException;
import java.rmi.registry.LocateRegistry;
import java.rmi.registry.Registry;

import remoteInterface.Calculator;

class Calculate {

private Calculator remoteProxy;

{
try {
Registry r = LocateRegistry.getRegistry("192.168.23.137");
remoteProxy = (Calculator) r.lookup("calculator");
} catch (RemoteException | NotBoundException e) {
e.printStackTrace();
}
}

public Calculate() {
}

public int add(int a, int b) throws RemoteException {
return remoteProxy.sum(a, b);
}

public int diff(int a, int b) throws RemoteException {
return remoteProxy.diff(a, b);
}

public int mul(int a, int b) throws RemoteException {
return remoteProxy.prod(a, b);
}

public int div(int a, int b) throws RemoteException {
return remoteProxy.quotient(a, b);
}
}

public class Caller {
public static void main(String[] args) {
try {
Calculate client = new Calculate();
System.out.println(client.add(Integer.valueOf(args[0]),
Integer.valueOf(args[1])));
System.out.println(client.diff(Integer.valueOf(args[0]),
Integer.valueOf(args[1])));
System.out.println(client.mul(Integer.valueOf(args[0]),
Integer.valueOf(args[1])));
System.out.println(client.diff(Integer.valueOf(args[0]),
Integer.valueOf(args[1])));
} catch (RemoteException e) {
e.printStackTrace();
}
}
}

The above Client first obtains the stub for the registry by invoking the static LocateRegistry.getRegistry("192.168.23.137") method with the ipAddress of the server where the remote Object is defined.If no hostname is specified, then null is used as the hostname indicating that the localhost address should be used.

Next, the client invokes the remote method lookup on the registry stub to obtain the stub for the remote object(calculator) here, from the server's registry.

Finally, the client invokes the the calculator methods one by one on the remote object's stub, sending in two command line arguments, which causes the following actions to happen:


  1. The client-side runtime opens a connection to the server using the host and port information in the remote object's stub and then serializes the call data.
  2. The server-side runtime accepts the incoming call, dispatches the call to the remote object, and serializes the result to the client.
  3. The client-side runtime receives, deserializes, and returns the result to the caller.
  4. The response message returned from the remote invocation on the remote object is then printed to System.out.

 ----------------------------------------------------------------

Running the distributed applications :
-> Set the JAVA CLASSPATH to include the bin directory which contains the classfiles on the server side 

anmol@anmol-bt:$ echo $CLASSPATH
/home/anmol/workspace/rmiJava8/bin

This step is needed so the rmiRegistry can lookup for class files on the CLASSPATH when the client connects to the rmiregistry to lookup for the remoteObject.
-> Next start the rmiRegistry
rmiregistry &
->  Step 1 , 2 and 3 on the server .

java remoteServer.RegisterRemoteCalculator

-> Step 4 on the Client

java client.Caller 9 5 

Output : 
14 Sum
4 Difference
45 Product
1 Quotient

For further analysis on this application , you can try and put a StackTraceElement on the server remote Object and as well print at the client side the list of names registered with the server's Registry. 

Feel free to comment and improve the content of this blog.

Happy Learning 

Registry Pattern - A Java Enterprise Design Pattern

Registry Pattern also called as the Name Service pattern.

Requirement : An object needs to contact other objects for which it knows only the object's name or the service it provides but not how to contact the object.

Case Study : A telephone company acquires other telephone companies and the company wants to expose the newly acquired companies' services using the companies existing interfaces. 

The existing company exposes interfaces and creates adapter objects by implementing these interfaces for each of the acquired systems and the implementations interact with the acquired systems in a way that makes the acquired systems to behave in the same way as the companies existing systems.

To make the new services available for client applications , mention the names of the new applications in a shared registry accessed by the client applications. The implementations of the acquired systems register their names with a registry object and when a client asks the registry to lookup a service , it returns a proxy object that can be used to communicate to the named object, since the proxy will encapsulate the knowledge of how to contact the named object.

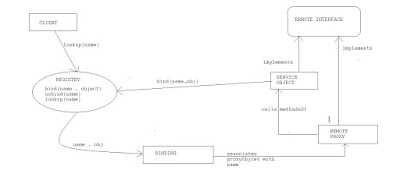
Solution : Register service-providing objects with a registry object that is widely known to other objects. The registration associates a name to the remote proxy that encapsulates the knowledge of how to call the methods of the named object. When given a name , the registry object produces the proxy.

Following are the participating components of this solution -
  • ServiceInterface: Interface that is implemented by both the ServiceObject and the RemoteProxy.
  • ServiceObject: The ServiceObject is the service provider that the clients wants to invoke methods on remotely, but does not know how to communicate with it.
  • RemoteProxy: This class is a proxy for ServiceObject , it implements ServiceInterface by remotely calling the corresponding methods of the ServiceObject.
  • Registry: The ServiceObject objects register themselves with the Registry object. The registration process involves sending the object's name along with a proxy object of the ServiceObject to the Registry's bind method. The registration remains in effect till the object's name is sent to Registry's unbind method and while registration is in effect , the Registry's lookup method returns the proxy when it is passed with the object's name.
  • Client: Client objects want to access the shared objects of the ServiceObject , but do not have any way to refer to it.What they know is the role|service name of the ServiceObject and a way to contact the Registry.

-> Following the above pattern :
1. Client objects are able to access service objects without having any prior knowledge of where the service objects are . It means it's possible to change the location of serviceObjects without having to make any change in the client classes.

2.Client and Service objects are required to have prior knowledge of where the Registry object lies.

Usage:

-> The registry pattern is used in computer networks The DNS application implements the Registry pattern , DNS binds names to ipAddresses than proxies.

-> Java's RMI protocol is an implementation of the Registry pattern, which we will be seeing in the next blog. 

Happy Learning 
Feel free to improve this writeup for better understanding.

Sunday, June 19, 2016

DS Basics : Java Collections to Implement Stack and Queue

Hi folks ,
 
This is a very basic java lesson to how understand how we can best implement  a stack and a queue using Java Collections .
 
Stack - A stack is a data structure used to store a collection of objects. When an object is pushed to a stack, it is placed on the top of all previously entered items. When an item is popped off , it is removed from the top of the stack. It's a LIFO data structure.
 
Queue - Queue is also a linear data structure, in which the first element is inserted from one end called REAR(also called tail), and the deletion of exisiting element takes place from the other end called as FRONT(also called head). This makes queue as FIFO data structure, which means that element inserted first will also be removed first.
 
Let's use collections to implement a stack and a queue.
 
In this lesson we will be using Java's Deque interface and ArrayDeque implementation  to implement stack as well as queue.
 
The methods used will be :
 
push() | addFirst() -> Adds elements to the top of the stack .
pop() | removeFirst() -> Removes elements from the top of the stack.
 
add() |  addLast() -> Adds elements to the end of the queue.
remove() | removeFirst() -> Removes elements from the head of the queue.
 
Let's write a quick small program .

package arraydeq;
import java.util.ArrayDeque;
import java.util.Deque;

public class ArrayDeqStack {
private Deque<Integer> stk = new ArrayDeque<Integer>();
 // We could have also used the stack class but the arraydeque is 
 // likely to be faster than Stack when used as a stack, and faster
 // than theLinkedList when used as a queue.  

public void stack() {
  stk.push(1);
  stk.push(2);
  stk.addFirst(3);
  stk.push(4);
  stk.push(5);
  System.out.println(stk);  // [5, 4, 3, 2, 1]
  System.out.println(stk.pop()); //5
  System.out.println(stk.removeFirst()); //4
  System.out.println(stk.pop()); //3
  System.out.println(stk.pop()); //2
  System.out.println(stk.pop()); //1
}


public void queue() {
  stk.add(1);
  stk.add(2);
  stk.addLast(3);
  stk.add(4);
  stk.add(5);
  System.out.println(stk); // [1, 2, 3, 4, 5]
  System.out.println(stk.remove()); //1
  System.out.println(stk.remove()); //2
  System.out.println(stk.remove()); //3
  System.out.println(stk.removeFirst()); //4
  System.out.println(stk.remove()); //5
 }
}

 
That's all folks , Happy Learning .

Sunday, June 12, 2016

LRU cache implementation in Java using LinkedHashMap

Hi Folks , 

If you have not worked on this problem before , the following might help you get an understanding. Most of the people fail to recognize that LinkedHashMap provides the support and can be used off-the-self with minimal code.

What is Least Recently Used (LRU) Cache ?? 


First , What is  a cache ?? 

A cache in Computing World, is a place to store something temporarily in a computing environment. Active data from any data Source be it a database or a file system or network , is often cached to shorten data access times, reduce latency and improve input/output (I/O) and hence the application performance.

Cache always has limited memory and can contain only limited number of items. 

Now what happens if a cache is full ?? 

If a cache is full, an item needs to be evicted from the cache. There are different algorithms used in Cache item eviction. The most popular one is the Least-Recently-Used. Hence the name LRU cache. It uses an algorithm to detect and evict items which are the oldest in the cache. The algorithm keep tracks of the items’ last accessed time. It evicts the items which have oldest access timestamp.

LRU Cache Implementation

java.util.LinkedHashMap is quite helpful in implementing a LinkedHashMap. It has a method removeEldestEntry() , that should be overridden. This method gets called after put() and putAll(). 

Based on its return value Map removes the old entry. If this method returns true, then old entry is removed. Otherwise it can stay in the Map. The default implementation of this method returns false and in such a case , the old entries remain in the Map and never get deleted.

Override the method and return true if the number of entries in the map is greater than initial capacity.

Let's write some code now - 

package sampleLru;

import java.util.LinkedHashMap;
import java.util.Map;

public class LRUCacheImpl<K, V> extends LinkedHashMap<K, V> {

private static final long serialVersionUID = 1L;
private int capacity;

public LRUCacheImpl(int capacity) {
super(capacity, 0.75f, true);
this.capacity = capacity;
}

public int getCapacity() {
return capacity;
}

/**
* removeEldestEntry() should be overridden by the user, otherwise it will
* not remove the oldest object from the Map.
*/
@Override
protected boolean removeEldestEntry(Map.Entry<K, V> eldest) {
if (size() > this.capacity) {
System.out.println("Cache is full : Eldest Entry is "
+ eldest.getKey());
}
return size() > this.capacity;
}

}

--------------------------------------------------------------------
package sampleLru;

import java.util.Map;

public class UseLRUCache {

public static void main(String[] args) {
Map<Integer, String> cache = new LRUCacheImpl<>(3);
cache.put(1, "One");
cache.put(2, "Two");
cache.put(3, "Three");
System.out.println(cache + " SIZE " + cache.size());
cache.get(1);
cache.put(4, "Four");
cache.get(3);
System.out.println(cache + " SIZE " + cache.size());
cache.put(5,"Five");
}

}

Console Output : 

{1=One, 2=Two, 3=Three} SIZE 3
Cache is full : Eldest Entry is 2
{1=One, 4=Four, 3=Three}
Cache is full : Eldest Entry is 1
-------------------------------------------------------------------

Let's try to understand the program and the output .

-> Extend the java.util.LinkedHashMap class, define a constructor that takes the capacity of the cache and instantiate a cache of that capacity.

for super(capacity, 0.75f, true); , see here for LinkedHashMap constructor , to understand what it means to send true or false.

accessOrder - the ordering mode - true for access-order, false for insertion-order.

-> Further override the removeEldestEntry method 

UseLRUCache : 

-> Create a cache of capacity 3 , add three elements to the cache with key 1,2 and 3.
-> Access element 1 , now 1 is the recently used entry and then 3 and least recently used entry is 2.
-> Add key 4 , this prints Cache is full : Eldest Entry is 2
-> Access element with key 3.
Now the 1 is the oldest entry then 4 and  the recently accessed is 3.
-> Adding key 5 to the cache , removes the entry 1 from the cache.

Please run the above program to better understand the LRU cache. Thanks for reading . My next blog will be about implementing an LRU cache in java from scratch using other collections.

Happy Learning

Saturday, June 11, 2016

One way InterThread communication using Buy Item / Replenish Store example

Hi Folks, 

Below i am explaining a basic E-commerce example where a user has two actions A (Add to Store) and B (Add to Cart) . The inventory is stored with an item number and quantity. 

Add to Cart : 
-> If item does not exist - return false with item not exists logger. 
-> If item exists , and quantity is short , wait for 5 seconds till another user adds the required quantity to the store, and calls notifyAll .
-> If after 5 seconds or after notify call , the quantity is not replenished , log it and return false. 
-> If after 5 seconds or after notify call , the quantity is replenished , return true .

Add to Store :
-> If item exists , update its quantity , call notifyAll to awake any waiting threads.
-> If item does not exists , create Inventory .

Please find the code that explains the above problem :

Thanks for reading, if any doubts please comment out , will be happy to help .

Happy Learning 

package ecomm;

public class Inventory {

    private int itemNumber;
    private int quantity;

    Inventory(int itemNumber, int quantity) {
        this.itemNumber = itemNumber;
        this.quantity = quantity;
    }

    public int getItemNumber() {
        return itemNumber;
    }

    public void setItemNumber(int itemNumber) {
        this.itemNumber = itemNumber;
    }

    public int getQuantity() {
        return quantity;
    }

    public void setQuantity(int quantity) {
        this.quantity = quantity;
    }
}
 

 ========================================================

package ecomm;

import java.time.Duration;
import java.time.Instant;
import java.util.Iterator;
import java.util.List;

public class InventoryManager {

    private List<Inventory> inventory;

    public InventoryManager(List<Inventory> inventory) {
        this.inventory = inventory;
    }

    public List<Inventory> getInventory() {
        return inventory;
    }

    public synchronized void addToStore(Inventory inventory) {
        for (Iterator<Inventory> itr = this.inventory.iterator(); itr.hasNext();) {
            Inventory current = itr.next();
            if (current.getItemNumber() == inventory.getItemNumber()) {
                System.out.println("Existing Inventory "
                        + current.getItemNumber() + " : "
                        + current.getQuantity() + " Adding more "
                        + inventory.getQuantity());
                current.setQuantity(current.getQuantity()
                        + inventory.getQuantity());
                notifyAll();
                return;
            }
        }
        System.out.println("New Inventory " + inventory.getItemNumber() + " : "
                + inventory.getQuantity());
        this.inventory.add(inventory);
    }

    public synchronized boolean addToCart(Inventory inventory) {
        boolean exists = false;
        Instant t = null;
        for (Inventory inv : this.inventory) {
            if (inv.getItemNumber() == inventory.getItemNumber()) {
                exists = true;
                if (inventory.getQuantity() > inv.getQuantity()) {
                    try {
                        System.out.println("Inventory is less in number "
                                + inv.getItemNumber() + " : "
                                + inv.getQuantity() + " Need : "
                                + inventory.getQuantity());
                        t = Instant.now();
                        wait(5000);
                    } catch (InterruptedException e) {
                        e.printStackTrace();
                    }
                }
                Instant n = Instant.now();
                System.out.println("Elements found "
                        + Duration.between(t, n).getSeconds());
                if (inventory.getQuantity() > inv.getQuantity()) {
                    System.out
                            .println("Quantity not replenished : failing order");
                    return false;
                } else {
                    System.out.println("Order Found " + inventory.getQuantity()
                            + " = " + inv.getQuantity());
                    inv.setQuantity(inv.getQuantity() - inventory.getQuantity());
                    break;
                }
            }
        }
        if (!exists) {
            System.out.println("Inventory not found exception");
            return false;
        }
        return true;
    }
}
 

==========================================================

package ecomm;

import java.util.List;
import java.util.Scanner;
import java.util.concurrent.CopyOnWriteArrayList;
import java.util.concurrent.ExecutionException;
import java.util.concurrent.ExecutorService;
import java.util.concurrent.Executors;

public class Starter {

    public static void main(String[] args) throws InterruptedException,
            ExecutionException {
        List<Inventory> inventory = new CopyOnWriteArrayList<Inventory>();
        for (int i = 1; i < 100; i++) {
            inventory.add(new Inventory(i, i * 3));
        }
        InventoryManager iM = new InventoryManager(inventory);
        ExecutorService service = Executors.newCachedThreadPool();
        Scanner sc = new Scanner(System.in);
        String read = sc.nextLine();
        while (!read.equals("quit")) {
            String[] nextSet = read.split(" ");
            String action = nextSet[0];
            int itemNumber = Integer.parseInt(nextSet[1]);
            int quantity = Integer.parseInt(nextSet[2]);
            service.execute(new Runnable() {

                @Override
                public void run() {
                    if (action.equals("B")) {
                        iM.addToCart(new Inventory(itemNumber, quantity));
                    } else if (action.equals("A")) {
                        iM.addToStore(new Inventory(itemNumber, quantity));
                    }
                }
            });
            read = sc.nextLine();
        }
    }
}